하나의 키보드와 마우스를 사용해서 여러대의 컴퓨터를 사용할 수 있도록 도와주는 프로그램이다.
다른 원격데스크톱과 별반 다를게 없을 듯 하지만 여러가지로 편리한 점도 있으니 한번 사용해 보는 것도 나쁘지는 않을 듯 하다.
가장 많이 알려진 Freeware로 Input Director 나 Synergy 가 있다.
가장 눈이띄는 특징은 Copy(Ctrl+C) & Paste(Ctrl+V) ^^
대충 구동방법은 이러하다......
1. 서버쪽(마우스+키보드가 연결된 컴퓨터)에서 Master모드로 실행하고

2. 클라이언트(원격으로 접속할 대상 컴퓨터)에서 Slave모드로 실행한다.

3. 서버쪽에서 클라이언트를 등록 후 실행하면 된다....

말은 정말 쉽다~~!! 설정하면서 많이 애를 먹는듯 한데.....^^
애먹는 원인은 Host이름부분에서 문제가 생기는 듯.....
서버쪽에서 클라이언트를 등록할때는 반드시 IP로 등록을 하도록 하자~~!!
자세한 설명은 아래의 폴딩치트를 보도록 하자~~!!
[[Input Director]] YoGiRo~~!!
Usage Guide for Input Director version 1.2
(If you haven't yet installed Input Director on your systems head over to the Quickstart Install Guide to show you how.)Contents:
- Using Input Director
- Preferences
- Skipping Slaves
- Information Window
- Popup Context Menu
- Setting up Data Encryption Security
- Keyboard Macros
1. Using Input Director
Now that Input Director is up and running and configured on your master system and your slave system you can start using it:
Assuming you had configured your slave as being to the right of your master system (go back and look here if you're not sure what side you've configured your slave on) then using your mouse you should be able to move your cursor to the right so that it goes beyond the right-side of the screen, it should disappear and re-appear on your slave screen. Anything you now type will be sent to the slave system. To switch back to the master system, simply reverse the process and move the cursor to the left side of slave screen and keep going until it re-appears on the master system.
If you set a hotkey for the slave, you can try that by hitting your hotkey combination. The cursor should appear in the center of the slave screen and you'll find that your mouse and keyboard input is now being redirected to the slave system.
If you start an application on the slave system and the system gets stuck and you need to return control to the master system, the default hotkey is left ctrl + left alt + control-break (control-break is the key marked pause/break to the right of the scroll-lock key on a standard keyboard). You can change this hotkey from the Main Input Director panel:

If things get really stuck, you can do a ctrl-alt-delete to regain control of input (on either master or slave systems).
If you click the X (cross) button in the upper-right-hand corner of the Input Director window, the window will be closed, but Input Director doesn't actually quit. The "ID" icon will remain on the Window notification status bar. This lets you do your work using Input Director without it being obtrusive and cluttering your screen or task bar.
You need to take sensible precautions in securing your system, especially if your systems have connectivity to untrusted networks (such as the Internet). It is highly recommended that you have at least one firewall in place (perhaps on your router/modem) or software firewalls protecting your systems. If you are concerned about how secure your systems are, ask a knowledgeable friend for help. You should also have a look at this question in the faq on securing Input Director.
There are some limitations surrounding the shared clipboard, particularly when copy/pasting files between machines. Its worthwhile having a look at the clipboard question/answers in the faq if you're going to be using the shared clipboard functionality.
2. Preferences
2.1 Global Preferences
On installation Input Director will be configured so that it is automatically started when you turn on your system. By default, it will start up in "disabled" mode rather than as a Master or Slave. To change this open the Input Director window and switch to the Global Preferences tab, you will see:
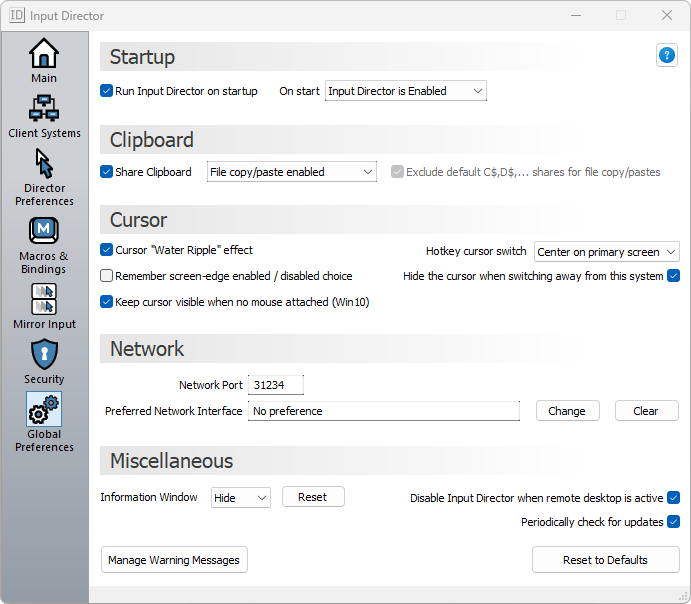
Startup -
- If you don't want Input Director to be automatically started by Windows when you login, uncheck the "Run Input Director on Startup" box.
- To have Input Director automatically switch into slave or master mode when it is started, choose the appropriate radio button next to "On start:".
Background Slave Mode - Setting this checkbox allows a slave to be controlled prior to login and when the Input Director application isn't running. For example, you can use this to fast user switch to a different account and control it; or log onto your slave using a user account that does not automatically start the Input Director application. Note: To use the remote clipboard or play a macro on a slave, the Input Director application must be running at the time.
Shared Clipboard - Check the "Shared Clipboard" box for this system to share clipboards with all participating slaves and the master. Clipboard file copy/pastes require that the files being copied are available via a Windows network shared directory and that the security has been setup such that the user logged in on the destination machine doing the copying can access the files.
A file to be copied doesn't need to have its immediate directory shared. For example, a file called "mydoc.txt" located in C:\Documents\Biz\, could have the "Biz" directory setup as a shared folder, or the "Documents" or even the C: drive's root folder, as long as the user on the other machine doing the pasting has appropriate access. When files are copied to the Input Director shared clipboard, Input Director looks through the list of shared directories on the system with the files and assesses which ones are available via network shared directories. If given a choice of shared directory, it will always pick the most immediate to the file. For example - if C:\Document\Biz has been shared as well as C:\Document, then C:\Document\Biz will be picked as this is the most immediate (closest) directory to the location of the file.
Under global preferences, there is an option to exclude "C$, D$ shares". These are Windows administrator shares that are setup by Windows and by default have very limited access. Because the access is so limited, checking this option will cause Input Director to ignore them when considering whether a file is available in a shared directory. If you did want to setup shares for for whole C: or D: drive, you are best of creating a new read-only share on the root directory and setting appropriate security permissions.
Preferred Network Interface - If your system has multiple network connections (For example, it is connected via ethernet to a LAN and it also has a modem connected to it, or it is wireless and also is connected to a network via ethernet) this setting allows you to choose a preferred network interface when communicating with slaves and masters. This choice is a preference in that, as an example, if on a master you have set your ethernet connection as the preferred interface, but the slave its trying to communicate with is only available via wireless, then the preference is ignored. This is an advanced option and should only be set if there are communication problems and the master and/or slaves are not able to connect to each other or the remote clipboard isn't working (e.g the clipboard is only working one direction but not the other).
Other options -
- When switching to a system (master or slave) via a hotkey the cursor is centered by default. You can choose not to have the cursor centered when you switch away from and then back to the system using hotkeys. Note: With this option on, the cursor will still be centered if you use your mouse to transition away from the system and a hotkey to switch back.
- If you find the visual transition effect annoying you can switch it off for this system by unchecking the Cursor "Water Ripple" effect box.
2.2 Slave Preferences
The Slave Preferences are located in the bottom third of the 'Slave Configuration' tab:

These 4 settings are only active when Input Director is in slave mode:
- A Master can request to all slaves that they shutdown (This is initiated on the Master via the "Shutdown Slave Workstations" button on the Main panel or via the "ID" icon's context-menu). Each slave can be set as to how to respond to this request. Up to 4 alternatives are provided: Do Nothing, Stand By, Hibernate and Shutdown. Only those choices that are valid on a particular system are shown.
- Synchronise locking this slave system with the Master - If the Master system has the input focus and the Windows-L command is hit, the Master system will be locked. Any slave that has this checkbox selected will be locked at the same time.
- Synchronise the screensaver with the Master System - a slave's screensaver will be switched on and off in lockstep with the Master's. Note: There can be 30 second gap between the master's screensaver activating and a slave's.
- Hide the cursor when switching away from this slave - With this checkbox selected, the cursor will be hidden when transitioning away from the slave. It can be made to reappear by transitioning back to it or by moving the locally attached mouse. Also, it will reappear after 30 minutes of inactivity on the slave.
2.3 Master Preferences
On your Master system, start Input Director and switch to the the "Master Preferences" tab:

Master specific preferences that can be set are:
- You can set a "held" key or keys that must be down for a screen-edge transition to occur (That is, being able to move the cursor off the screen to the right or left and have it appear or another system). This is useful if you find that you cursor keeps slipping between systems when you don't intend it. A good choice for this is the shift key (which means that the shift key must be held down whilst moving the cursor off the screen on the master and the slaves to cause it to switch to the another system).
- Ctrl-Alt-Delete equivalent - If a slave system has input focus and you wish to do the equivalent of ctrl-alt-delete, a different key combination is necessary (as typing ctrl-alt-delete will always occur on the Master system even when input is with a slave). The default hotkey is ctrl-alt-insert. This key combination will also work on the Master system.
- It is sometimes desirable not to allow screen-edge transitions (that is, have the cursor slip of the side of the monitor on one system to another). Toggling screen-edge transitions on and off can be achieved by right-clicking on the "ID" icon on the system in question and selecting the "No screen-edge transitions" menu item. You can also setup hotkeys from here to achieve the same result. When using the hotkeys it will allow/stop screen-edge transitions on the system that is currently being directed (master or a slave).
- Hotkeys can be set up jump left, right, up and down from one system to another.
- Check offline slaves availability - You can set the master to check if any unavailable slaves are now available periodically (from every 10 seconds through to 30 minutes, or never). If you don't want a particular slave checked (one that perhaps is available but you to want skip it nonetheless) then set the 'skip' flag against that slave in the Master Configuration.
- Time to wait for a slave to respond - When Input Director communicates with a slave to transition control to, it will wait up to the time set here for a response. If the slave does not respond in time, then it will prompt you as to whether you wish to skip this slave.
- By default, the Master's keyboard caps lock, scroll lock and numlock lights reflect the system currently being controlled. To switch this feature off, uncheck the "Master Keyboard LEDs reflect the status of the directed slave" option
- Use this system's mouse preferences - When controlling a slave, by default, the mouse speed set on the slave's computer is used. By selecting this option, the master's Windows mouse settings are used when controlling slaves.
- An Input Director Master communicates in the background with slaves on a regular basis (e.g. to switch the screensaver off/on, to update a slave's information window, etc). If it cannot resolve the slave's hostname it will automatically mark it as being unavailable. If you do not wish Input Director to mark slaves as unavailable as part of its background activities then check the "Do not automatically update a slave's unavailability status" option.
- Every time a transition occurs directing input to a slave, that slave's hostname is looked up. For some systems this can cause a noticable pause. By checking the "Use cached slave IP addresses" option, Input Director will only look the slave's hostname up once and then cache this information for future transitions. This caching can be a problem in rare situations in which the slave's IP address changes throughout the day.
3. Skipping Slaves
As part of the Master Configuration, a slave can be temporarily marked as one that should be "skipped" when transitioning between systems. For example:

In the screenshoot above the slave "jane" is positioned between bob and the Master system but has its Skip flag checked. When moving the cursor between the Master System and the remaining slave, Input Director will treat the "jane" system as if it doesn't exist. A slave's skip flag setting is temporary and not remembered between restarting Input Director or rebooting the Windows system.
You can quickly unskip a slave by using its hotkey to switch over to it. If the switch is successful, the slave's skip flag will be cleared.
To learn more about slave skipping, have a look here in the FAQ.
4. Information Window
The master and slave systems can display an Information Window, which indicates Input Director's status and which system currently has the input focus. To control the information window, switch to the "Global Preferences" tab. There is a "Show" push button which can be selected and deselected, and a "Reset" button to reset the Information window back to its defaults.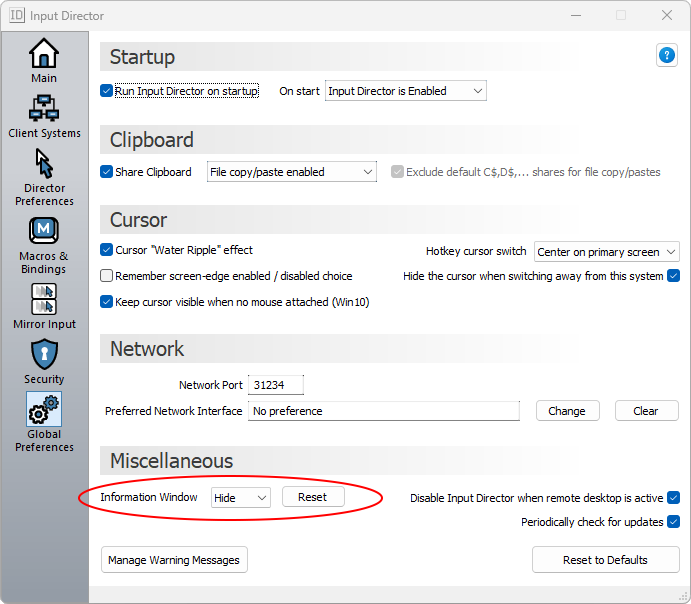
Press the "Show" button and the Information Window will pop-up in the bottom-right hand corner of the screen:
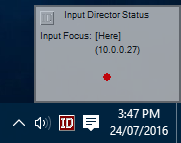
If the window doesn't pop-up, make sure that Input Director is enabled as a Slave or a Master. By default, if Input Director is disabled the window will remain hidden.
When input switches from one system to another, all Input Director's displaying the information window will be updated. For example:
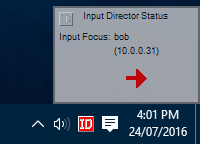
The information window can be resized by positioning the cursor on the edge of the window (the cursor will change to a double-headed arrow), holding down the mouse button and dragging the mouse. The contents will be scaled accordingly.
The window can can re-positioned by putting the mouse anywhere in its center and then holding down the mouse button. The cursor will change to a four-headed arrow and the window can be moved to a different location.
The preferences for the Information Window are found in its context menu. To open this menu, right-click on the information window:
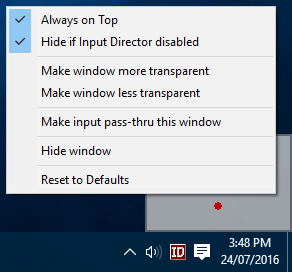
From here you can make the window more or less transparent, uncheck the "Hide if Input Director disabled" flag so that the window is always visible, or uncheck the "Always on Top" flag so that other windows can obscure it.
If you select "Hide window" and you change your mind, you'll need to return to the Global Preferences tab in Input Director and re-press the Information Window's "Show" button to redisplay it.
"Make input pass-thru this window" means that once enabled, any clicks on the information window will pass through it to any window or the desktop below it as if the Information Window isn't there. This means that once you have enabled this option you cannot resize, reposition, change the transparency of the Information Window, as you will not be able to right-click on it to bring up the context menu. To be able to change it again you must bring up the Global Preferences tab in Input Director and click the Information Window "Reset" button.
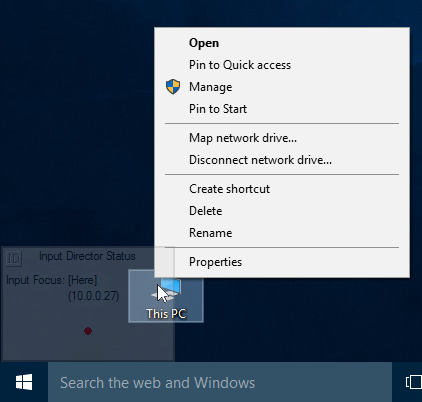
The idea behind the "Make input pass-thru this window" is that once you have sized and positioned the Information Window, this option can be selected and then it will not interfere with the control of other windows, icons on the desktop, etc even if it is overlaid on top of them:
5. Pop-up Context Menu
If you right-click on the "ID" icon on the notification status bar, you will be presented with a shortcut menu that lets you disable/enable Input Director, shutdown it down, etc:
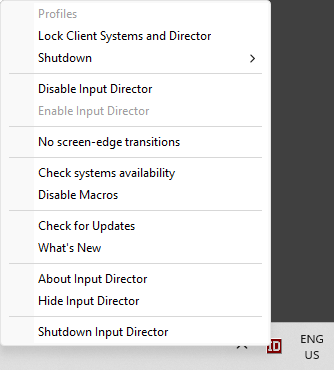
On the Master system, the option "Shutdown Slaves and the Master" provides a shortcut to turning all the systems off. (A slave must have its "Shutdown this slave if directed to by the Master" option selected). Click here to see more information about this slave setting. The "Lock Slaves and Master" operates similarly.
If Input Director is hidden, you can double-click with the left mouse-button on the "ID" icon to display the Input Director window.
6. Setting up Data Security Encryption
If you are using Input Director on a network that isn't secure or closed, you can choose to enable data security to encrypt the information sent between masters and slaves. Input Director uses the Advanced Encryption Standard cipher to encrypt data (AES has been adopted by the US Government as an encryption standard).
Enabling encryption may cause the mouse or keyboard to feel less responsive on older hardware. This is because all the input information sent across must be encrypted by the master and then decrypted by the slave before it is used. This can also impact the remote clipboard as this data will also be encrypted and decrypted on the fly.
Encryption is configured on a per-slave basis. So you can choose to only encrypt data to one slave but not another. Also, you can set a different password for each slave if you wish.
If you have multiple slaves and you want to have data security active for all of them, you need to run through the following process for each slave.
To setup encryption:
i. Open Input Director on your slave and switch to the Slave Configuration 'tab':

The unlocked padlock indicates that the slave does not have encryption active.
Press the "Change" button to bring up the 'Set Security' dialog box:
ii. Change the Encryption field to 'AES Encryption', Select a Key length and choose a password:
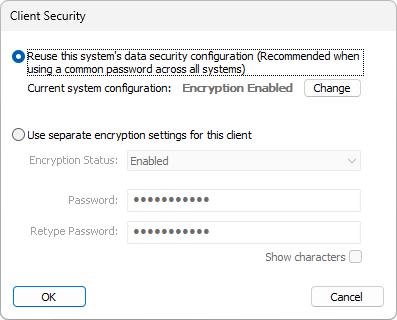
The longer the key length the more secure the data. But this also may impact a systems responsiveness on older hardware. The best thing to do is give it a try and see if you notice any slowdown and then adjust accordingly.
Input Director does not enforce password standards (such as a minimum length or a mixture of alphabetic and numeric characters). You must ensure you pick a difficult to guess password. It is recommended that a password is at least 8 characters and contains one or more numerals. Passwords are case-sensitive.
Click 'Okay' to activate encryption on the slave.
iii. The encryption is now active on the slave as indicated by the padlock and description:

iv. The slave configuration on the Master must now be updated:
Open Input Director on the Master and switch to the 'Master Configuration' tab:

Select the slave that now has data security and press 'Edit' to open up the 'Slave Configuration' window:

Click the 'Change' button to set the reciprocal data security settings for the slave
v. Set the Encryption, key length and password to match the same as the slave's:

Click OK to save your changes
Input Director will now attempt to communicate with the slave. If the password or keylength doesn't match the slave then a message will pop-up explaining which part doesn't match. This check is also made when you click the 'Scan Slaves' button at the bottom of the Master Configuration tab
If there is a mismatch between the data security encryption set on a slave and its configuration on the master, the master will automatically 'skip' that slave.
If your slave does not have a keyboard/mouse attached to it, always change the data security on the slave first. Then update that slave's security settings on the Master.7. Keyboard Macros
Input Director has the ability to record and playback keyboard macros. A keyboard macro is a stored sequence of keystrokes that can be played back whenever triggered. In the case of Input Director, a macro has a hotkey assigned to it and this is used to trigger the playback. Macros can be played back to the system which currently has input focus, only to slaves or the master system, to a specific slave, or to all the systems.
Macros are managed by the Input Director application on the master system. Its from here that the recording of macros, the playback and their configuration are handled.
The Input Director macro system is not designed to be a fully-fledged Windows based macro solution (there are many alternatives available, which can be found via your favourite search engine). Rather, it provides a mechanism to record keystrokes (nb: mouse movements/button clicks are not recorded) and play them back to a master or over the network to a slave system. (Nb: If you have 3rd-party Macro automation software installed, it may be possible to record an Input Director macro to playback a keystroke/sequence that is a trigger to activate one of the automation software's macros).
Macros have many uses. For example, you can record a macro to startup an application (by recording a key sequence that opens the Windows Run dialog box by hitting the Win-R key combination and then typing in the name of an application to run) or controlling the audio volume (this can be handy if your speakers are attached to one of your slave systems as you can take advantage of recording macros that are then bound to that specific slave), etc. In fact, most things that can be entered via the keyboard can be recorded as macro.
To learn more about using Input Director macros have a look at the Q&A on Macros in the FAQ.
Where to from here?
If you have further questions about Input Director, the next port of call is the FAQ or you can contact the author.
[[Synergy]] YoGiRo~~!!
Running Synergy
Synergy lets you use one keyboard and mouse across multiple computers. To do so it requires that all the computers are connected to each other via TCP/IP networking. Most systems come with this installed.
Step 1 - Choose a server
The first step is to pick which keyboard and mouse you want to share. The computer with that keyboard and mouse is called the "primary screen" and it runs the synergy server. All of the other computers are "secondary screens" and run the synergy client.
Step 2 - Install the software
Second, you install the software. Choose the appropriate package and install it. For example, on Windows you would run SynergyInstaller. You must install the software on all the computers that will share the mouse and keyboard (clients and server). On OS X you'll just have a folder with some documentation and two programs. You can put this folder anywhere.
Step 3 - Configure and start the server
Next you configure the server. You'll tell synergy the name of the primary and secondary screens, which screens are next to which, and choose desired options. On Windows there's a dialog box for setting the configuration. On other systems you'll create a simple text file.
Note that when you tell synergy that screen A is to the left of screen B this does not imply that B is to the right of A. You must explicitly indicate both relations. If you don't do both then when you're running synergy you'll find you're unable to leave one of the screens.
Windows
On Windows run synergy by double clicking on the synergy file. This brings up a dialog. Configure the server:
- Click the Share this computer's keyboard and mouse (server) radio button
- Click the Screens & Links Configure... button
- Click the + button to add the server to the Screens list
- Enter the name of server (the computer's name is the recommended name)
- Optionally enter other names the server is known by
- Click OK
- Use the + button to add your other computers
- Using a computer's name as its screen name is recommended
- Choose desired screen options on the Add Screen dialog
- Use the controls under Links to link screens together
- Click (once) on the server's name in the Screens list
- Choose the screen to the left of the server; use --- if there is no screen to the left of the server
- Choose the screens to the right, above and below the server
- Repeat the above steps for all the other screens
- Click OK to close the Screens & Links dialog
- Use Options... to set desired options
- If the server's screen name is not the server's computer name:
- Click Advanced...
- Enter the server's screen name next to Screen Name
- Click OK
Now click Test. The server will start and you'll see a console window with log messages telling you about synergy's progress. If an error occurs you'll get one or more dialog boxes telling you what the errors are; read the errors to determine the problem then correct them and try Test again. See Step 5 for typical errors.
Unix or Mac OS X
Create a text file named synergy.conf with the following:
    section: screens
       screen1:
       screen2:
    end
    section: links
       screen1:
           right = screen2
       screen2:
           left = screen1
    end
Replace each occurrence of screen1 with the host name of the primary screen computer (as reported by the hostname program) and screen2 with the host name of a secondary screen computer. In the above example, screen2 is to the right of screen1 and screen1 is to the left of screen2. If necessary you should replace right and left with left, right, up, or down. If you have more than two computers you can add those too: add each computer's host name in the screens section and add the appropriate links. See the configuration guide for more configuration possibilities.
Now start the server. Normally synergy wants to run "in the background." It detaches from the terminal and doesn't have a visible window, effectively disappearing from view. Until you're sure your configuration works, you should start synergy "in the foreground" using the -f command line option.
On unix type the command below in a shell. If synergys is not in your PATH then use the full pathname.
synergys -f --config synergy.confOn OS X open Terminal in the Utilities folder in the Applications folder. Drag the synergys program from the synergy folder onto the Terminal window. The path to the synergys program will appear. Add the following to the same line, type a space at the end of the line but don't press enter:
-f --configNow drag the synergy.conf file onto the Terminal window and press enter. Check the reported messages for errors. Use ctrl+c to stop synergy if it didn't stop automatically, correct any problems, and start it again.
Step 4 - Start the clients
Next you start the client on each computer that will share the server's keyboard and mouse.
Windows
On Windows run synergy by double clicking on the synergy file. This brings up a dialog. Configure the client:
- Click the Use another computer's shared keyboard and mouse (client) radio button
- Enter the server's computer name next to Other Computer's Host Name
- This is not the server's screen name, unless you made that the server's host name as recommended
- If the client's screen name is not the client's computer name:
- Click Advanced...
- Enter the client's screen name next to Screen Name
- Click OK
Now click Test.
Unix or Mac OS X
To start a client on unix, enter the following:
synergyc -f server-host-name
where server-host-name is replaced by the host name of the computer running the synergy server. If synergyc is not in your PATH then use the full pathname.
On OS X open Terminal in the Utilities folder in the Applications folder. Drag the synergyc program from the synergy folder onto the Terminal window. The path to the synergys program will appear. Add the following to the same line and press enter:
-f server-host-name
When you added the client to the server's configuration you chose a name for the client. If that name was not client's host name then you must tell the client the name you used. Instead of the above command use this instead:
synergyc -f --name name server-host-namewhere name is the name for the client in the server's configuration. (On OS X drag the synergyc program to the Terminal window rather than typing synergyc.)
Step 5 - Test
Clients should immediately report a successful connection or one or more error messages. Some typical problems and possible solutions are below. See the troubleshooting and the FAQ pages for more help.
- failed to open screen (X11 only)
Check permission to open the X display;
check that the DISPLAY environment variable is set
use the --display command line option. - address already in use
Another program (maybe another copy of synergy) is using the synergy port; stop the other program or choose a different port in the Advanced... dialog. If you change the port you must make the same change on all of the clients, too.
- connection forcefully rejected
The synergy client successfully contacted the server but synergy wasn't running or it's running on a different port. You may also see this if there's a firewall blocking the host or port. Make sure synergy is running on the server and check for a firewall.
- already connected
Check that the synergy client isn't already running.
- refused client
Add the client to the server's configuration file.
- connection timed out
Check that server-host-name is correct.
Check that you don't have a firewall blocking the server or synergy port. - connection failed
Check that server-host-name is correct.
When successful you should be able to move the mouse off the appropriate edges of your server's screen and have it appear on a client screen. Try to move the mouse to each screen and check all the configured links. Check the mouse buttons and wheel and try the keyboard on each client. You can also cut-and-paste text, HTML, and images across computers (HTML and images are not supported on OS X yet).
Step 6 - Run
Once everything works correctly, stop all the clients then the server. Then start the server with the Start button on Windows and without the -f option on Unix and Mac OS X. Finally start the clients similarly. On Windows before clicking Start you may want to set the Logging Level to Warning so the logging window doesn't pop up (because you currently can't close it, just minimize it).
You can also configure synergy to start automatically when your computer starts or when you log in. See the autostart guide for more information.
Command Line Options Guide
Common Command Line Options
The following options are supported by synergys and synergyc.
| -d, | --debug level | use debugging level level | ||
| --daemon | run as a daemon (Unix) or background (Windows) | |||
| -f, | --no-daemon | run in the foreground | ||
| --display display | connect to X server at display (X11 only) | |||
| -n, | --name name | use name instead of the hostname | ||
| --restart | automatically restart on failures | |||
| -1, | --no-restart | do not restart on failure | ||
| -h, | --help | print help and exit | ||
| --version | print version information and exit |
Debug levels are from highest to lowest: FATAL, ERROR, WARNING, NOTE, INFO, DEBUG, DEBUG1, and DEBUG2. Only messages at or above the given level are logged. Messages are logged to a terminal window when running in the foreground. Unix logs messages to syslog when running as a daemon. The Windows NT family logs messages to the event log when running as a service. The Windows 95 family shows FATAL log messages in a message box and others in a terminal window when running as a service.
The --name option lets the client or server use a name other than its hostname for its screen. This name is used when checking the configuration.
Neither the client nor server will automatically restart if an error occurs that is sure to happen every time. For example, the server will exit immediately if it can't find itself in the configuration. On X11 both the client and server will also terminate if the connection to the X server is lost (usually because it died).
Server Command Line Options
synergys [options]The server accepts the common options and:
| -a, | --address address | listen for connections on address address | ||
| -c, | --config pathname | read configuration from pathname |
address has one of the following forms:
    hostname
    :port
    hostname:port
hostname is a hostname or IP address of a network interface on the server system (e.g. somehost or 192.168.1.100). port is a port number from 1 to 65535. hostname defaults to the system's hostname and port defaults to 24800.
Client Command Line Options
synergyc [options] address[:port]address is the hostname or IP address of the server and port is the optional network port on the server to connect to. The client accepts the common options.
[Input Director]
| 제작사 홈페이지 : | http://www.inputdirector.com/ |
| 파일다운로드(직접) : | |
| 파일다운로드(링크) : | here |
[Synergy]
| 제작사 홈페이지 : | http://synergy2.sourceforge.net/ |
| 파일다운로드(직접) : | |
| 파일다운로드(링크) : | here |
'유용한 정보 > · 프로그램' 카테고리의 다른 글
| 퇴근시간 화면보호기 (1) | 2009.01.08 |
|---|---|
| 원격제어 (TeamViewer) (0) | 2008.12.18 |
| 비스타 서비스팩2 정보 및 공식 다운로드 (VISTA SP2) (0) | 2008.12.09 |
| The KMPlayer (build 1433 정식) (0) | 2008.12.08 |
| WOL (Wake On Lan) 활용 >> 원격에서 PC를 켜보자... (0) | 2008.12.05 |
 InputDirector.v1.2.zip
 SynergyInstaller-1.3.1.rar


